As with most homebrewing activities, the first step is to make sure all your equipment and bottles are clean and sanitized. The counter pressure bottle filler may be sanitized easily by opening all of the valves and submerging it in a bucket of sanitizer solution. Let it sit in the solution for a few minutes. After you get everything hooked up as described below, make sure you blow all the sanitizer out with CO2 .
Now gather as many sanitized bottles and caps as you’d like to fill, and have your bottle capper handy. Before bottling using the counter-pressure bottle filler, your beer should be fully carbonated. Get it as close to 32ºF as you can; this helps to minimize foaming. You’ll also want to have a tray to catch any spillage. OPTIONAL: It also helps to minimize foaming if you place your bottles in the freezer after you’ve cleaned and sanitized them. The colder the environment, the less foam you’ll encounter.
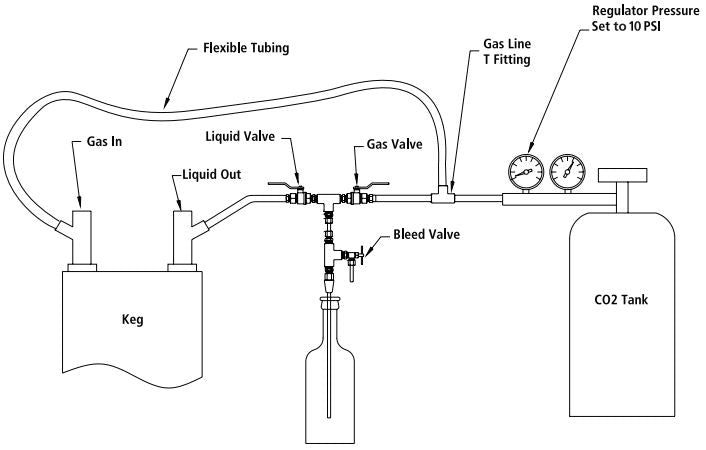
Make sure that all three of the valves (gas, liquid, bleed) are CLOSED before you attach anything. First, connect the liquid out quick disconnect from the keg to the gas line T-fitting. Then connect the CO2 tank to the T-fitting. Lastly, connect the gas in quick disconnect to the keg. Set your regulator to about 10 psi. The first time you are using a counter pressure bottle filler, be patient. You might open the wrong valve at the wrong time and get a face full of beer. You can’t rush the process, or you’ll end up with bottles full of foam. So relax, don’t worry, have a homebrew. Now let’s fill some bottles!
- If your homebrew keg is currently connected to the CO2 tank, disconnect it and pull the pressure relief valve until the hissing stops.
- Place the beer bottle on the tray to catch any spillage. Insert the filler into the bottle, making sure that the stopper is firmly seated in the neck of the bottle
- Open the gas in valve fully and allow the bottle to reach the same pressure as the keg. You’ll be able to tell because the “hissing” noise will stop.
- Open the bleed valve slightly. This will purge the oxygen from the bottle and replace it with CO2 . Leave the valve open for about 10 seconds.
- Close the bleed valve and allow the bottle to pressurize again.
- Close the "gas in" valve.
- Open the liquid valve fully. No beer will flow at this point because the bottle and the keg are at the same pressure.
- Here’s where you need to be patient: SLOWLY crack open the bleed valve just a little bit. You should see beer start to flow into the bottle. Don’t rush it unless you would like to clean up a foamy mess and waste precious beer.
- Fill the bottle all the way up to the bottom of the stopper. This will result in the proper headspace when the filler is removed.
- Close the bleed valve.
- Close the liquid in valve. All 3 valves should be closed at this point.
- Again, SLOWLY crack open the bleed valve and allow pressure to vent slowly. This should take about 15 seconds, and some foam will be generated.
- Cap the bottle. It’s okay if there’s still some foam; this will actually help prevent oxidation.
- Repeat until all your bottles are filled.
- CLEAN UP! After disconneting everything, open all 3 valves and submerge it in your bucket of sanitizer, then make sure it is dry before you store it. This will help make sure that you don’t get any mold or other bacteria growing in the tubing.